DJ & Orchestra Add-On Detailed Documentation
The DJ & Orchestra Management Add-On is a simple and powerful tool for managing music events. It helps you organize musicians, schedule events, and track payments all in one place.
Introduction
The DJ & Orchestra Management Add-On is a comprehensive platform that streamlines the end-to-end management of musical events and performers. It enables administrators to manage Musicians, Events, Contracts, Payments, Owner Customizations, and Equipment Inventories, while the Mewayz (Formerly Seemless)board provides a real-time snapshot of key metrics, including event statuses, contract progress, musician availability, and revenue performance, all from one centralized system.
How to Install the Add-On?
To Set Up the DJ & Orchestra Add-On you can follow this link: Setup Add-On.
How To Install DJ & Orchestra Add-On?
Dashboard
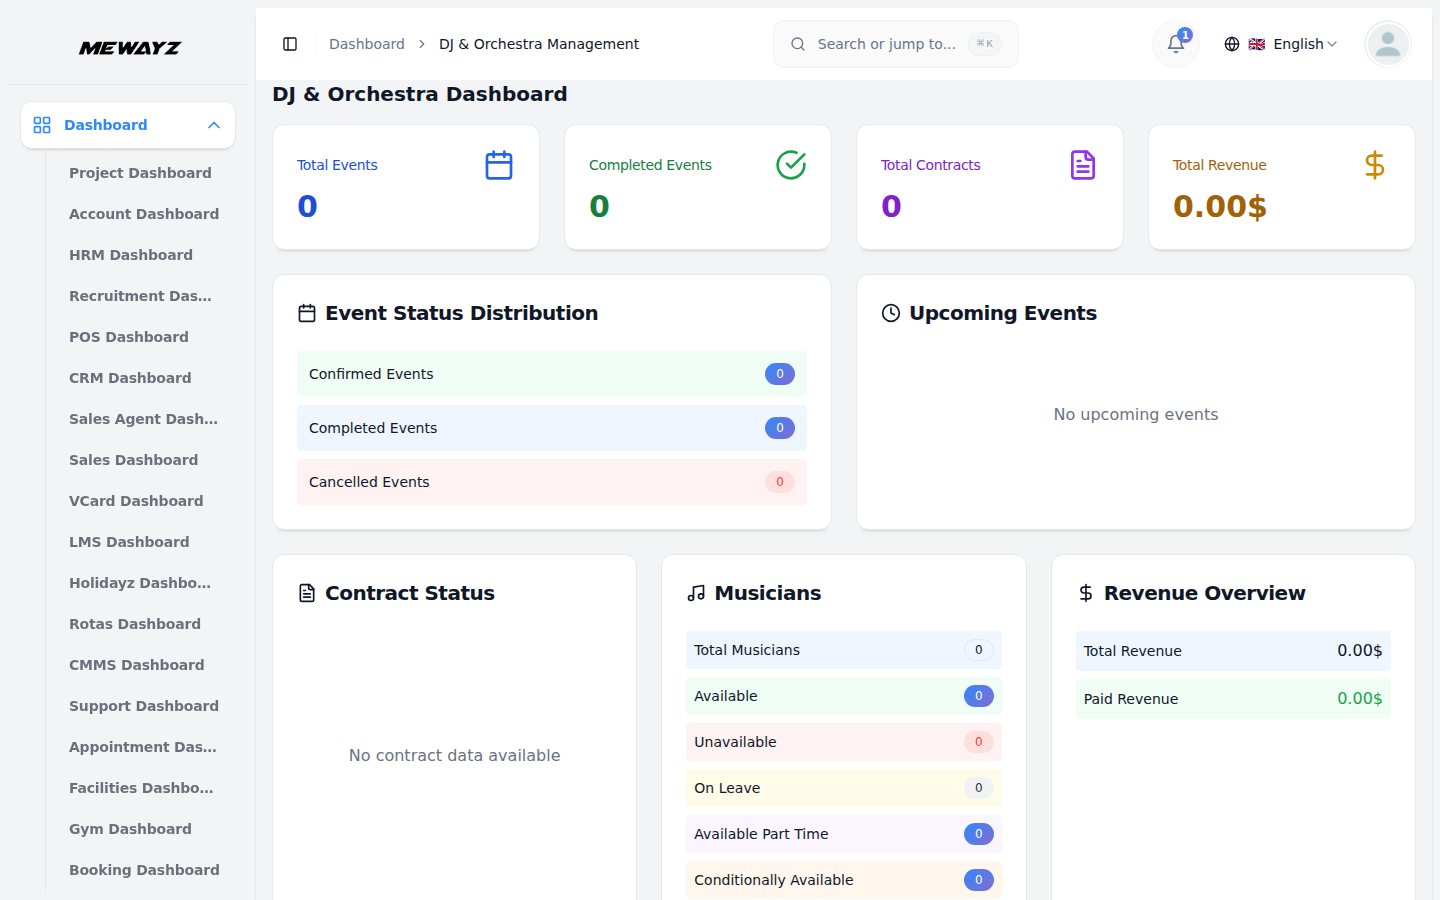
- The DJ & Orchestra Management Dashboard provides a complete overview of event operations,
- At the top, you’ll find a row of summary cards displaying key metrics across the system: Total
- The dashboard includes an Event Status Distribution chart that shows the breakdown of all events
- The Upcoming Events panel highlights scheduled engagements with details such as event name,
- The Contract Status panel presents a visual overview of contract progress through a pie chart,
- The Musicians panel summarizes the availability of performers, showing totals across categories
- The Revenue Overview panel provides a financial snapshot, displaying both Total Revenue and Paid
- Finally, the Recent Events panel lists the latest activities with event names, dates, and status
- The Musician Dashboard gives each musician a personalized view of their assigned events and
- The Upcoming Events section highlights confirmed engagements assigned to the musician with
contracts, musician availability, and revenue performance through clear visual elements and summary information.
Events, Completed Events, Total Contracts, and Total Revenue. These figures give you a quick snapshot of overall activity and financial performance.
as a segmented graph, categorized by Confirmed, Completed, and Cancelled statuses. This allows you to quickly assess the balance of event outcomes and monitor progress at a glance.
date, venue, and expected revenue. This section helps administrators track future commitments and prepare resources accordingly.
enabling quick identification of active, pending, or completed agreements.
such as Available, Unavailable, On Leave, Part-Time, and Conditionally Available. This ensures efficient scheduling and resource allocation for upcoming events.
Revenue, helping you monitor cash flow and outstanding balances.
badges (Completed or Cancelled). This section allows administrators to review past performance and maintain accurate records of event outcomes.
schedule. At the top, summary cards display Total Events, Upcoming Events, Completed Events, and Total Contracts counts.
venue, date, and charge amount. The Recent Events panel lists their most recently active events along with the event name, date, and current status.
System Setup
- The System Setup section allows administrators to configure foundational data used across the
system. It currently includes Service Types, Musician Types, and Event Categories, which are referenced when managing bookings and talent throughout the platform.
Service Types
- To add a new service type, click the “Create” button on the Service Types page. In the form that
- The Service Types list displays all configured options in a table with columns for Service Type
- Available Actions: Use the Edit to update or modify an existing service name, and the Delete to
opens, enter the name of the service in the Service Type field.
and Action.
permanently remove the service type from the system.
Musician Types
- To add a new musician type, click the “Create” button. In the creation form, first select the
- The Musician Types list provides a categorized view, showing the relationship between the
- Available Actions: Use Edit to change the musician’s title or their associated service category,
Service Type from the dropdown (comes from the service type section), then enter the specific Musician Type in the field.
Service Type and the specific Musician Type, and actions.
and Delete to remove the entry.
Event Categories
- To add a new event category, click the “Create” button. In the provided field, enter the Event
- Available Actions: Use the Edit to rename a category and the Delete to remove it. Ensure no
Category Name. The Event Categories list page displays a table of all active event categories and actions.
active events are currently assigned to a category before deleting it to maintain data integrity.
Manage Musicians
- To add a new musician record, click the “Create” button on the Manage Musicians page. In the form
- Select the Service Type and Musician Type from their respective dropdowns(populated from the
- Set the Availability using the radio buttons; options include Available, Unavailable, On Leave,
- The list page displays all musician records in a table with columns for Musician, Email, Contact,
- Use the Search bar to find specific musicians by name. Apply filters using the Musician, Musician
- In the Actions column, select Edit to modify an existing musician record, or Delete to permanently
that opens, select the Musician Name from the dropdown, then enter the Email and Contact No in their respective fields.
options configured in the system), then enter the Experience Level in its field. Select the Health Status from the dropdown (Good, Fair, Poor, or Excellent).
Available Part Time, and Conditionally Available. Click Create to save the record, or Cancel to discard it.
Musician Type, Service Type, Experience Level, Health Status, Availability, and Actions. The list can be viewed in either list or grid layout using the toggle buttons.
Type, and Availability dropdowns to narrow down results. Click Apply to activate the filters or Clear to remove them. The number of records displayed per page can also be adjusted using the per-page selector.
remove the musician from the system.
Manage Events
- To add a new event record, click the “Create” button on the Manage Events page. In the form that
- Choose the Musician from the dropdown, then select the Event Date Range using the date picker.
- The list page displays all event records in a table with columns for Musician, Event Name, Owner
- The Status field reflects the current state of the event. It can be one of three values: Confirmed
- Use the Search bar to find specific events by name. Apply filters using the Event Category and
- In the Actions column, select the Payment to process a payment for an event, the View to inspect
- For Completed or Cancelled events, only the View action is available, as these records can no
- When you click the payment option, a form will open displaying the Event Details, including the
opens, enter the Event Name, Owner Name, and Owner Contact. Select the Event Category from the dropdown (populated from the categories configured in the system) and enter the Location in the provided field.
Enter the Event Charge amount in the designated field. Click Create to save the record, or Cancel to discard it.
Name, Owner Contact, Event Category, Event Charge, Status, and Payment Status.
(the event is scheduled and approved), Completed (the event has already taken place), or Cancelled (the event has been called off).
Musician dropdowns to narrow down results. Click Apply to activate the filters or Clear to remove them.
the full details of an event record, the Cancel to cancel the event, the Edit icon to modify an existing record, and the Delete icon to permanently remove the event from the system.
longer be modified or actioned.
Event Name, Owner, Event Category, and Total Amount. Select the Bank Account from the dropdown, verify the Amount, and set the Payment Date using the date picker. Optionally enter a Reference No and a Note for the transaction. The Total Amount is displayed at the bottom of the form. Click Create Payment to complete the transaction, or Cancel to discard it.
Event Payments
- The Manage Event Payments page displays all payment records in a table with columns for Event
- The Status field reflects the current state of the payment. It can be one of two values: Cleared
- Use the Search bar to find specific payment records by name. The Amount and Payment Date columns
- In the Actions column, the options available depend on the payment’s current Status. For Pending
- For cleared payments, only the View action is available, as these records have already been
Name, Owner Name, Amount, Payment Date, Reference No, Status, and Actions.
(the payment has been verified and successfully processed) or Pending (the payment has been submitted but is still awaiting approval).
support sorting to help organize records as needed.
payments, three actions are available: Approve to confirm and clear the payment, Reject to decline the payment, and View to inspect the full payment details.
finalized and can no longer be modified.
Manage Contracts
- To add a new contract record, click the “Create” button on the Manage Contracts page. In the form
- Enter the Contract Amount, optionally add a Contract Clause in the text area, and select the Bank
- The list page displays all contract records in a table with columns for Musician, Event, Contract
- The Payment Status field reflects the current state of the contract. It can be one of three
- Use the Search bar to find specific contract records by name. The Contract Date and Contract
- In the Actions column, the options available depend on the contract’s current Payment Status. For
- For Paid and Rejected contracts, only the View action is available, as these records have already
that opens, select the Musician and Event from their respective dropdowns (comes from the event section), then set the Contract Date using the date picker.
Account from the dropdown. Click Create to save the record, or Cancel to discard it.
Date, Contract Amount, Payment Status, and Actions.
values: Draft (the contract has been created but is pending approval), Paid (the contract has been approved and payment has been completed), or Rejected (the contract has been declined).
Amount columns support sorting to help organize records as needed.
Draft contracts, five actions are available: Approve to confirm and move the contract forward, Reject to decline it, View to inspect the full contract details, Edit to modify the record, and Delete to permanently remove it.
been finalized and can no longer be modified.
Owner Customization
- To add a new owner customization record, click the “Create” button on the Manage Owner
- Fill in the Preferred Genre and Performance Style fields, then optionally enter Special Effects,
- The list page displays all owner customization records in a table with columns for Event, Owner
- Use the Search bar to find specific records by name. Apply filters using the Event dropdown to
- In the Actions column, three actions are available for all records: View to inspect the full
Customizations page. In the form that opens, select the Event Name from the dropdown (comes from the event section) and enter the Owner Name.
Stage Setup Requirements, and Song Requests in their respective text areas. Click Create to save the record, or Cancel to discard it.
Name, Preferred Genre, Performance Style, and Actions.
narrow down results. Click Apply to activate the filter or Clear to remove it.
customization details, Edit to modify an existing record, and Delete to permanently remove it from the system.
Equipment Inventories
- To add a new equipment inventory record, click the “Create” button on the Manage Equipment
- Set the Last Used date using the date picker and select the Status using the radio button options:
- The list page displays all equipment inventory records in a table with columns for Image, Name,
- The Status field reflects the current state of the equipment. It can be one of five values: Active
- Use the Search bar to find specific equipment records by name. Apply filters using the Status
- In the Actions column, three actions are available for all records: View to inspect the full
Inventories page. In the form that opens, enter the Name, Type, Brand, and Quantity fields.
Active, Inactive, Damaged, In Use, or In Repair. Optionally upload an Image using the Browse button and enter any additional Notes in the text area. Click Create to save the record, or Cancel to discard it.
Type, Brand, Quantity, Last Used, Status, and Actions.
(the equipment is available and ready for use), Inactive (the equipment is not currently in use), Damaged (the equipment has been reported as damaged), In Use (the equipment is currently being used), or In Repair (the equipment is undergoing maintenance).
dropdown to narrow down results. Click Apply to activate the filter or Clear to remove it. The Name, Type, and Brand columns also support sorting to help organize records as needed.
equipment details, Edit to modify an existing record, and Delete to permanently remove it from the system.